How to Make String Art: Beginner Step-by-Step Guide
Learn how to make string art with a simple heart project, basic materials, nail spacing guidance, threading steps, common mistakes, and photo-pattern tips.
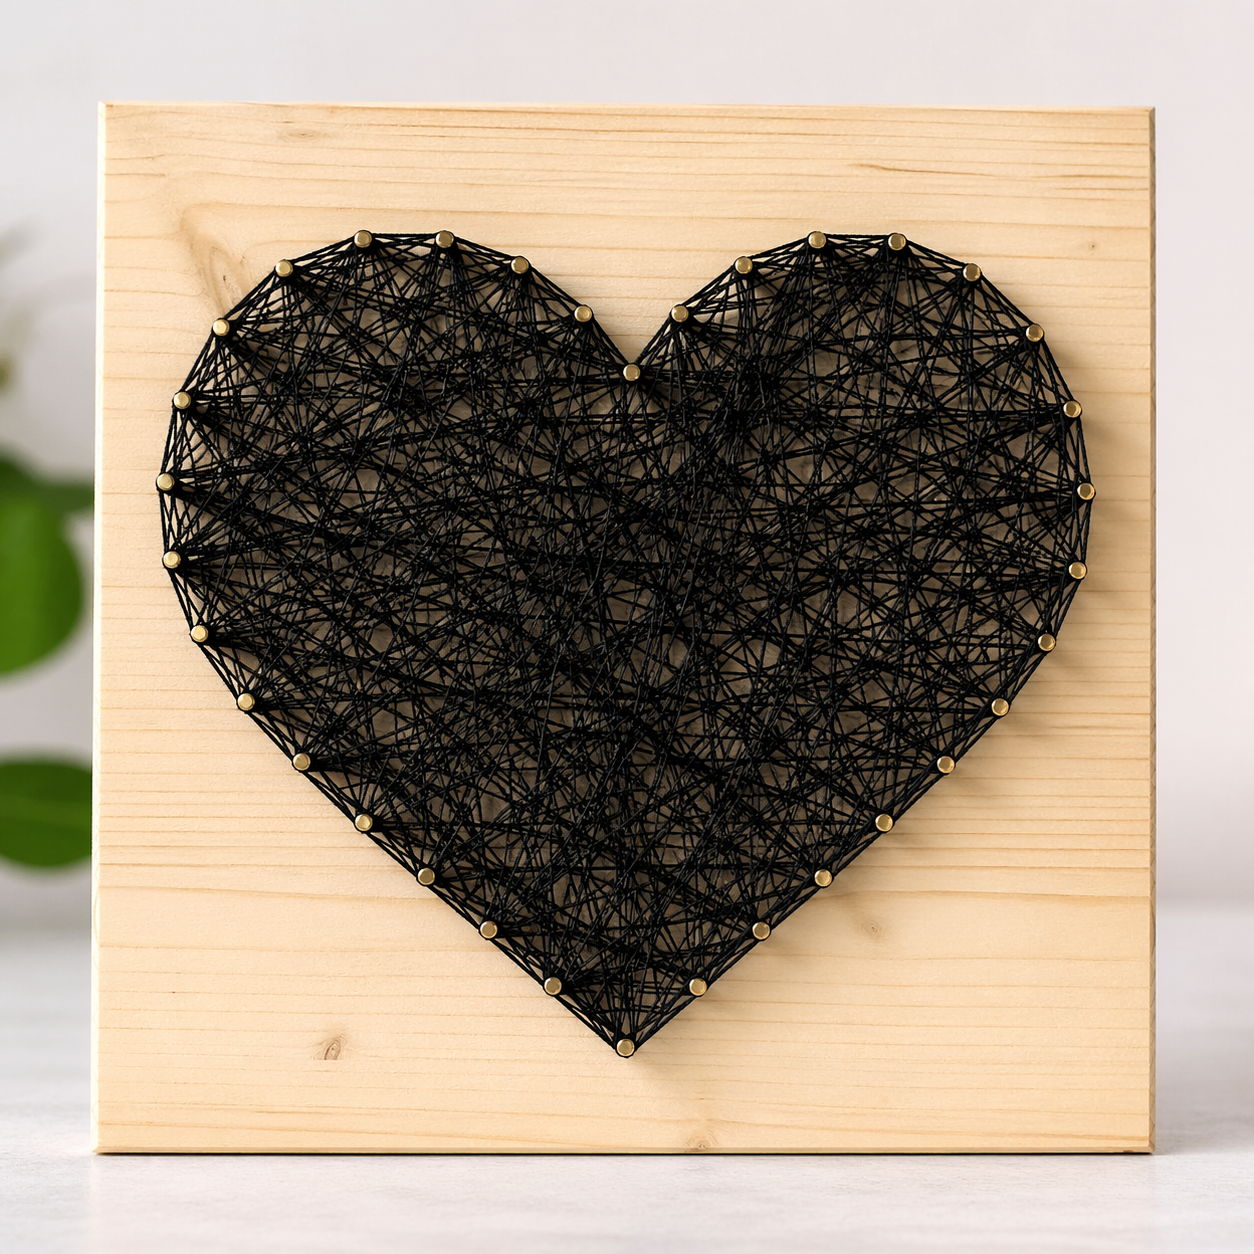
Hi, I'm Steak, the person behind this site. I got interested in string art last year, and that curiosity was one of the reasons I started this website. For this guide, I kept the first project practical: a simple heart on a 20x20 cm wood board, using ordinary nails and black thread. This article shows how to make string art through a beginner workflow, the sources I checked, and the photos from this project so you have a clear starting point. Let's make one.
A finished string art piece can look much harder than the actual first project needs to be.
The confusing part for beginners is usually not one dramatic technique. It is the small setup questions: what board to use, how simple the pattern should be, how far apart the nails should go, how tight the thread should feel, and when to stop adding more lines.
The project stays simple on purpose. You will make a basic nail-and-thread string art piece with a heart pattern, using ordinary materials and a manageable process. The example shown here uses a 20x20 cm square wood board, ordinary gold nails, and black standard thread. It took about two hours from setup to finish.
How to Make String Art: The Short Version
The basic answer to how to make string art is simple: mark a clear shape on a board, hammer small nails along the outline, remove or ignore the guide marks, tie thread to one nail, then wrap the thread between nails until the shape reads clearly. Finish by tying off the thread and trimming the end.
If you want the broader background first, this site also has a separate guide to what string art is. This article stays focused on making a first piece.
Plan Your First String Art Project
What You Need to Make String Art
When you are learning how to make string art, you do not need a specialized kit. You need a surface, anchor points, thread, and a pattern simple enough to follow.
Start with these materials:
- A wooden board
- A printed template or lightly drawn outline
- Small nails or panel pins
- Thread or embroidery floss
- A hammer
- Tape, if you are using a paper template
- Scissors
- A pencil or ruler, if you want to mark spacing before hammering
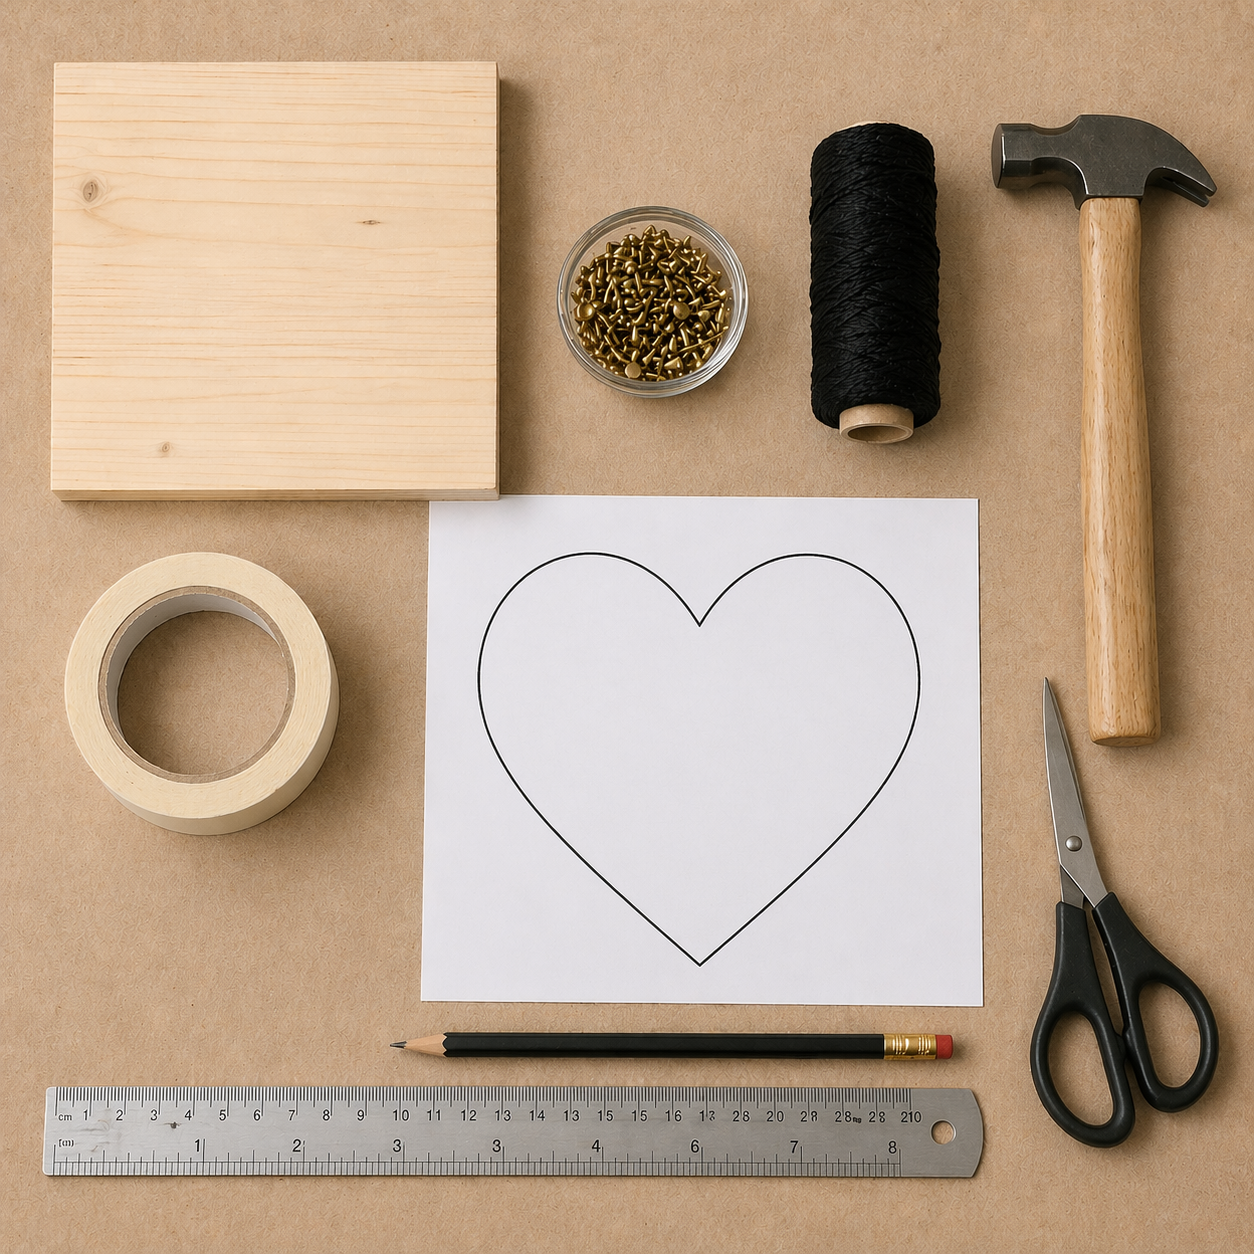
The photographed project uses an ordinary square wood board instead of a custom craft blank. That is enough for a first attempt. The nails are ordinary gold nails, and the thread is black standard thread. A thicker thread or embroidery floss can also work, but the main thing is that it should wrap cleanly around the nail heads without fraying immediately.
If a child is doing the project, treat the hammering step as supervised work. For adults, the main safety point is simpler: slow down around the nails. Rushing the hammering or forcing a nail that is not going in straight can make the project messier than it needs to be.
Pick a Simple First Pattern
The first real decision in how to make string art is the pattern. Your first string art pattern should be easy to recognize from its outline.
A heart, star, letter, or geometric shape is a better first project than a detailed portrait. That is not because complex string art is impossible. It is because detailed images depend on many more points, more careful spacing, and a more deliberate thread path. Those are easier to learn after you have already finished one simple piece.
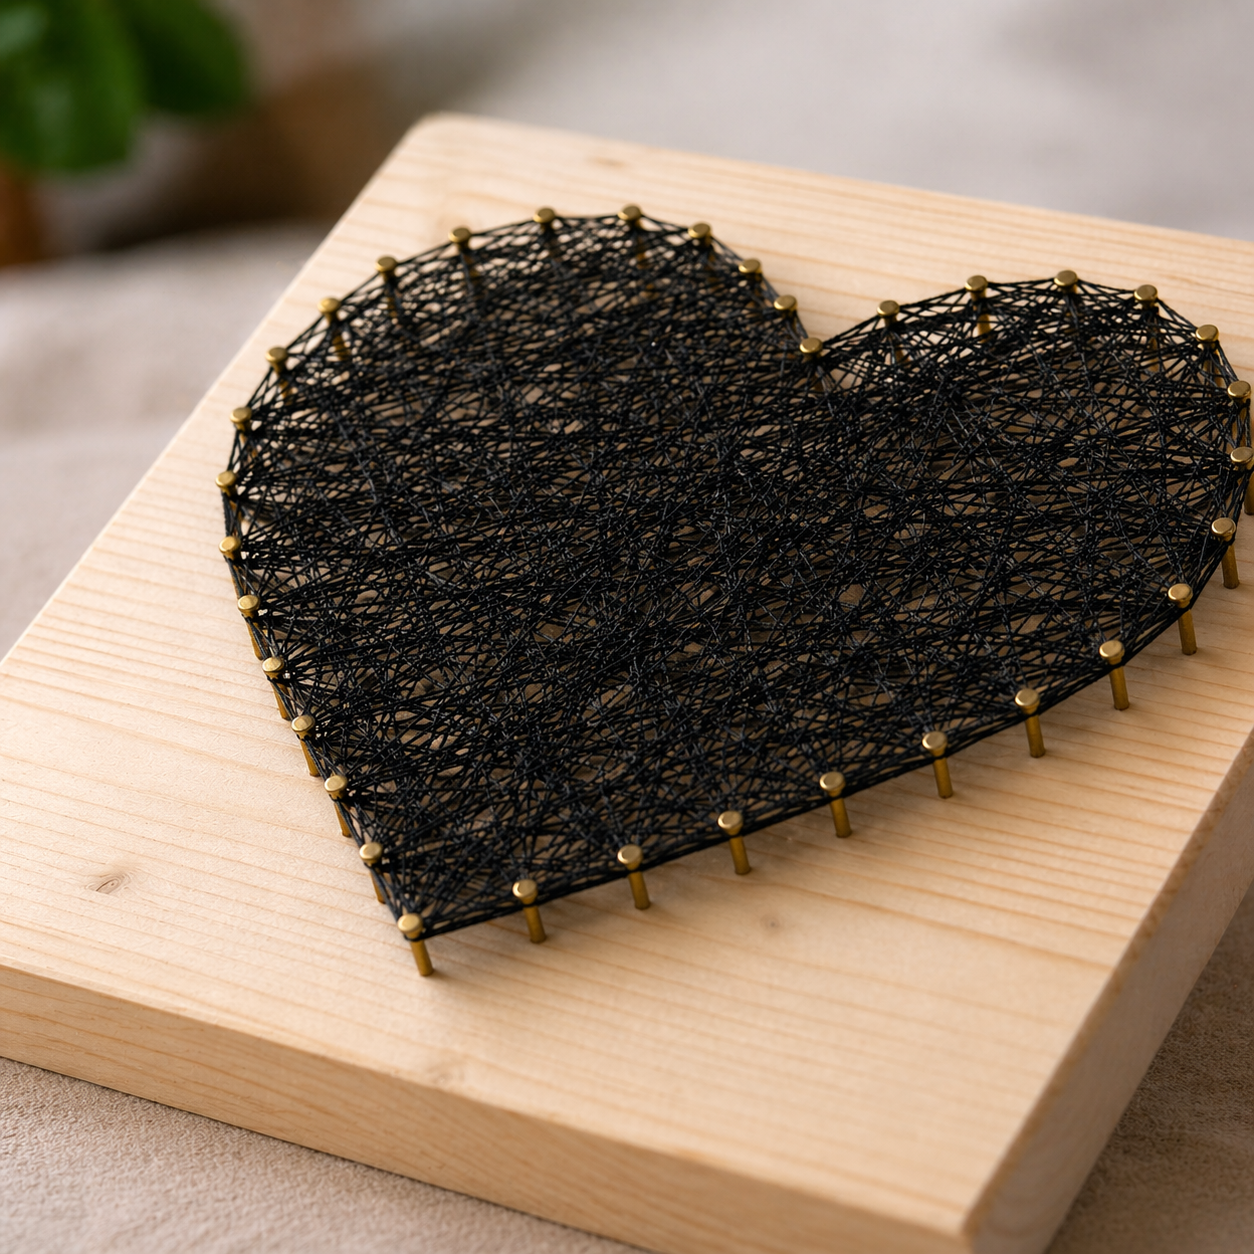
The example in this guide uses a heart because the shape is clear even when the spacing is not perfect. That matters. On a first project, you want the final piece to still work if a few nails are slightly off.
You can use a printed template taped to the board, or you can lightly draw the outline by hand. A template is usually easier if you want cleaner curves. A hand-drawn outline is fine for a loose practice piece. Either way, keep the shape large enough that you have room to hammer the nails without crowding them.
Make the String Art Piece
Step 1: Mark the Shape and Hammer the Nails
Place the template or outline on the board before you start hammering. If you are using paper, tape it down so it does not shift while you work. If you are drawing directly on the board, make the marks light enough that they will not distract from the finished piece.
Then add nails around the outline.
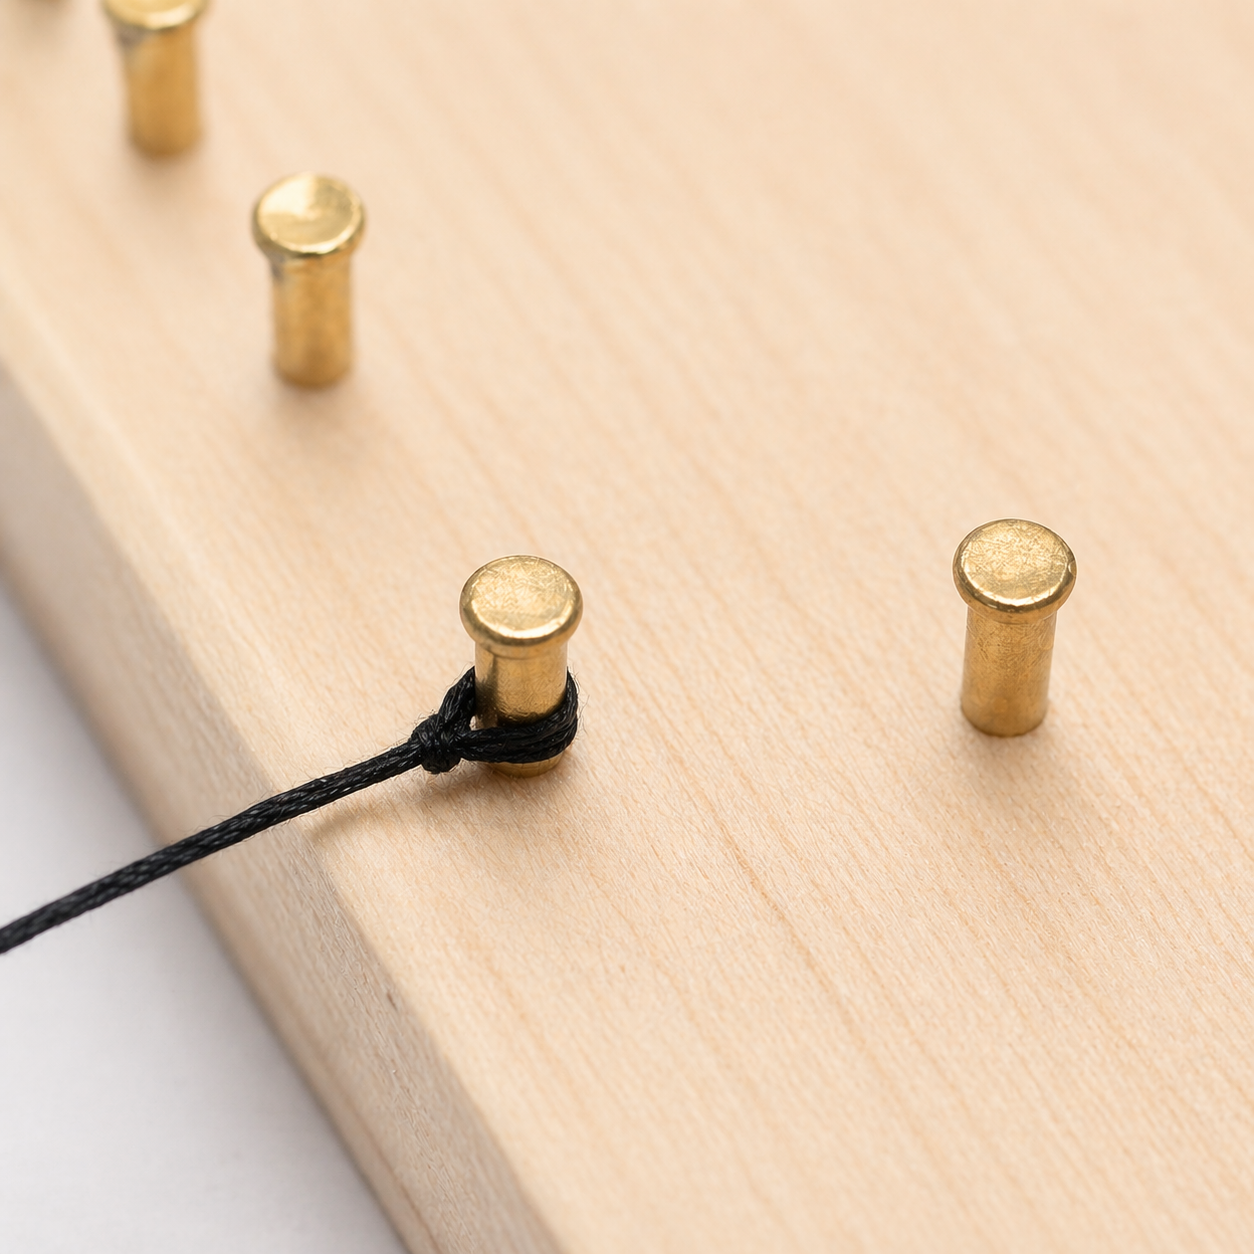
The goal is not mathematical perfection. The goal is a clean enough row of anchor points for the thread to follow. For the heart project shown here, the nails were spaced at about 1 cm apart. That worked for this 20x20 cm board and simple heart shape, but it should not be treated as a universal rule. Smaller boards, sharper curves, and more detailed patterns may need different spacing.
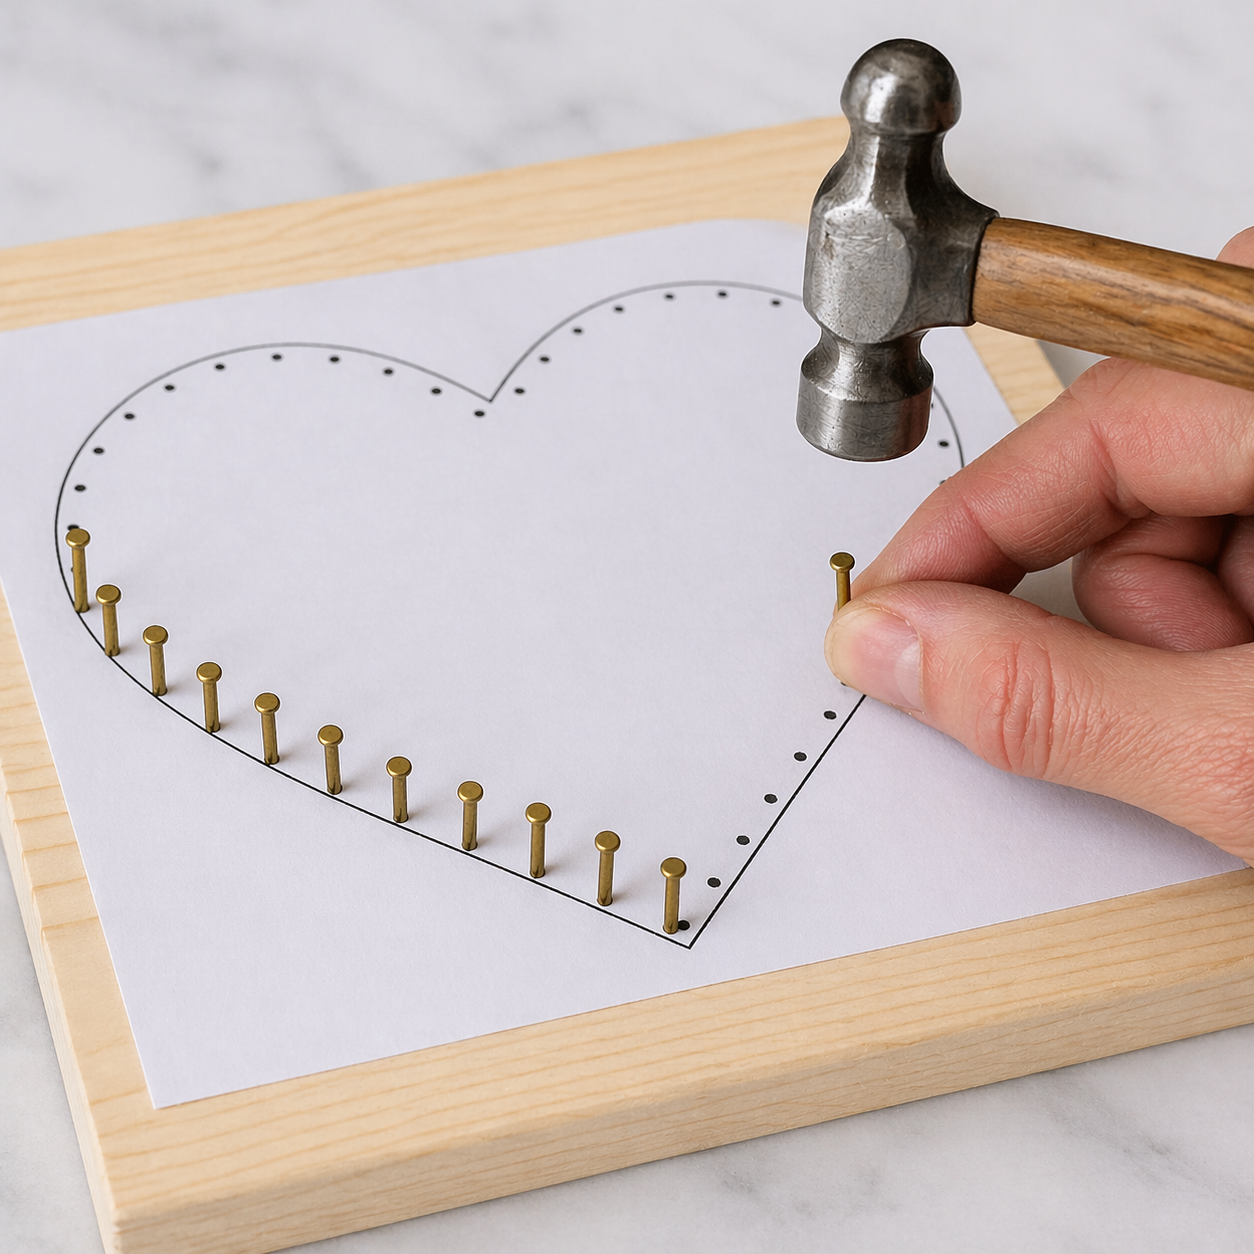
As you hammer, try to keep two things consistent:
- The distance between neighboring nails
- The height of the nail heads above the board
The nail heads need to stay exposed so the thread has something to catch on. If some nails are much lower than others, the thread path can become uneven. If some nails lean too far sideways, gently straighten them before moving on.
The hardest part of the photographed heart project was keeping the nail spacing consistent. Some gaps ended up a little too wide, and some were a little too narrow. The finished piece still worked because the overall outline stayed readable. That is a useful expectation for beginners: aim for even spacing, but do not restart the whole project over a few imperfect gaps.
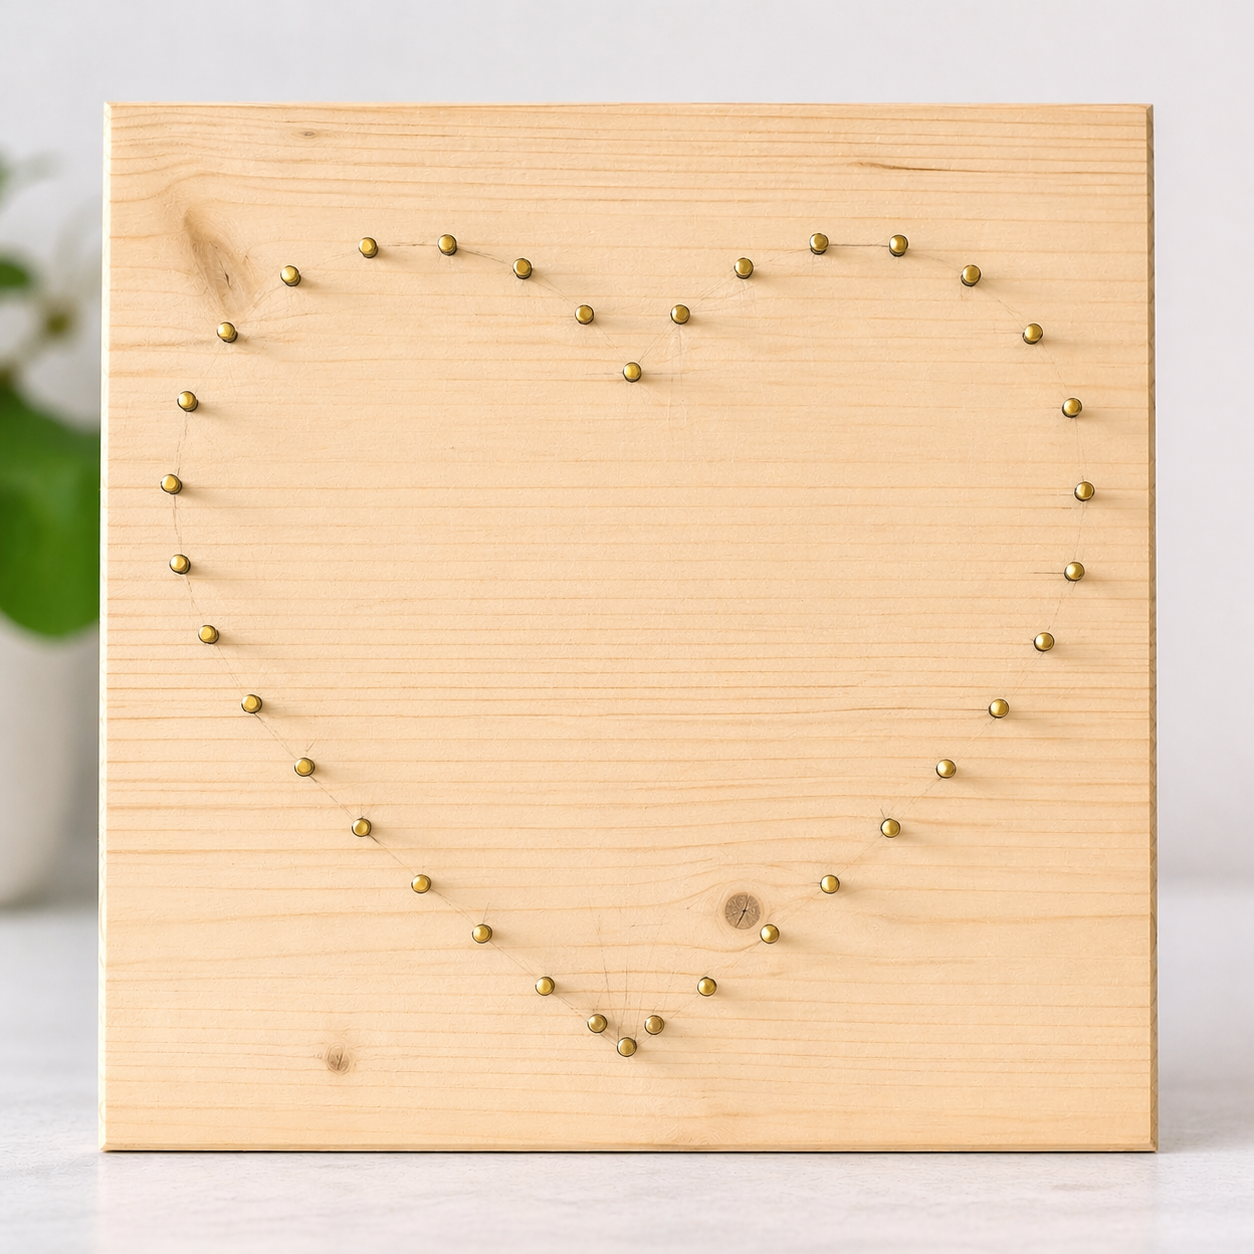
Once all the nails are in place, remove the paper template if you used one. If small bits of paper tear around the nails, pull them out slowly rather than yanking. You want the nail line to stay stable before the thread goes on.
Step 2: Tie the First Knot and Start Threading
Choose a nail as your starting point and tie the thread around it with a small knot. Leave a short tail so the knot does not slip while you begin wrapping. You can trim the tail later.
For a simple heart, you do not need an advanced thread pattern. Start by wrapping around nearby nails to define part of the outline, then move across the shape to begin filling the inside. Each time you reach a nail, loop the thread around it once before moving to the next nail. That small loop helps the thread hold its place instead of sliding upward.
Keep the thread taut, but do not pull as hard as you can. Too little tension makes the lines sag. Too much tension can pull nails out of alignment or make the thread harder to control. A useful beginner test is to keep the thread firm enough that it sits cleanly between nails, while still letting you guide it without fighting the board.
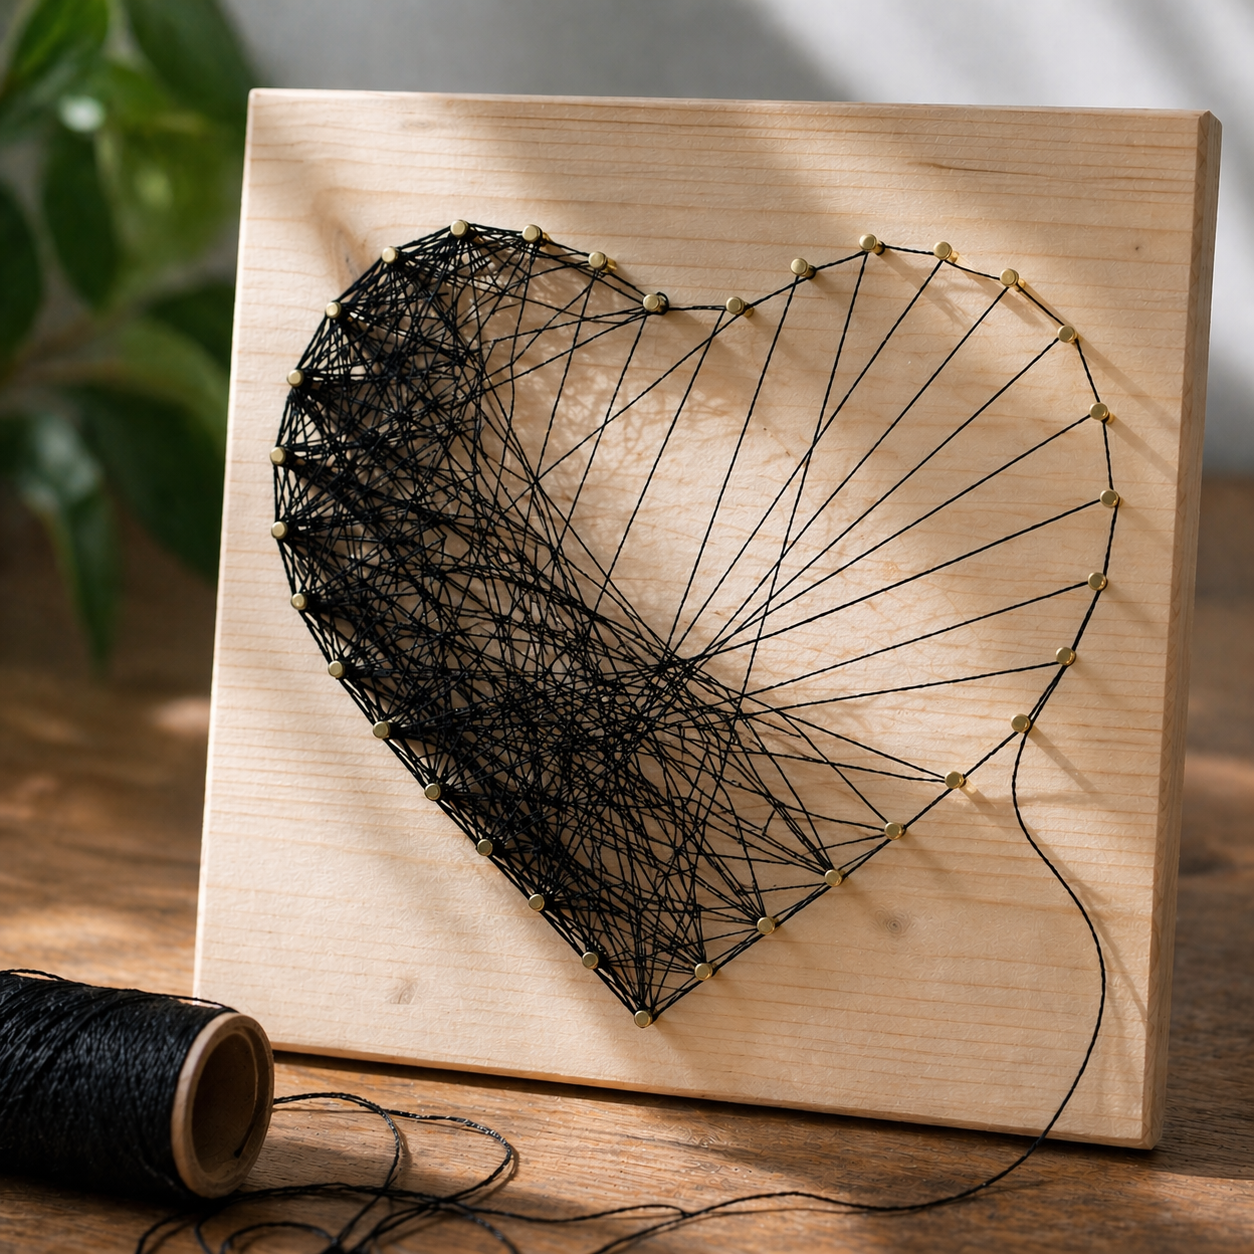
There is more than one acceptable path through a simple shape. You can work in a loose crisscross pattern, move around the outline gradually, or fill one area before moving to another. What matters is that the heart still reads clearly and the thread distribution does not become too heavy in one corner.
Pause every few minutes and look at the piece from farther away. Close-up, the thread can look messy because you are focused on individual lines. From a normal viewing distance, the shape often becomes clearer.
Step 3: Finish the Piece Without Overcomplicating It
The first project does not need to fill every empty space.
Stop when the outline is clear and the inside has enough thread density to feel intentional. If you keep adding lines after that point, the design can start to look crowded. This is especially true with dark thread, because overlapping lines quickly become visually heavy.
When you are ready to finish, bring the thread back to a nail that already has a stable wrap around it. Tie a small knot, pull it snug, and trim the excess thread. If the tail is visible, tuck it along the nearest wrapped section or trim it close enough that it does not distract.
The heart project shown here took about two hours. That time includes the setup, nail placement, threading, and finishing. A smaller or looser project may take less time. A denser pattern or more careful template work may take longer.
The more useful lesson is not the exact time. It is that a first string art piece is slowest during setup. Once the nails are placed, the threading becomes easier to adjust as you go.
Beginner Mistakes and Next Steps
Common Beginner Mistakes to Avoid
The easiest way to make string art harder is to choose a first project that gives you no room to recover.
Here are the mistakes worth avoiding:
- Choosing a pattern that is too detailed. A portrait or complex photo-based pattern is better after you understand how the thread behaves.
- Treating nail spacing as an exact universal rule. About 1 cm worked for this heart project, but spacing depends on the board, shape, and level of detail.
- Hammering nails to very different heights. Uneven nail height makes the thread harder to control.
- Pulling the thread too tight. Firm is good. Forcing the thread can shift nails or make the pattern harder to manage.
- Adding thread after the shape already reads clearly. More lines do not always make the piece better.
- Restarting over small imperfections. Slight spacing changes are visible up close, but they often matter less in the finished piece than they seem during the process.
The spacing issue is the most realistic one to expect. Even on the example project, some gaps were too wide and others too narrow. The fix was not to restart. It was to keep the rest of the outline steady and let the thread pattern carry the shape.
Want to Make String Art From a Photo Later?
Once you have made one simple handmade piece, photo-based string art starts to make more sense.
A generator is useful when you want a pattern from a specific image, but it should not replace the basic craft knowledge you gain from a simple first project. After you have hammered nails, tied thread, managed tension, and seen how spacing affects the final piece, the generated pattern is easier to understand.
StringArt.cc can be one next step for that use case. The verified workflow is simple: upload a photo, choose settings, generate the pattern, and download it.

That does not mean your first project needs to be a photo portrait. In most cases, it should not be. Start with a handmade shape first. Use the generator later when you are ready to turn a photo into a more structured thread pattern.
Final Thought
If you are learning how to make string art for the first time, stop trying to make the first piece impressive.
Use a simple shape. Keep the materials basic. Space the nails as evenly as you can without treating the measurement like a law. Tie the thread securely, keep the tension moderate, and stop when the design is clear.
A first project does not need perfect spacing or a complex image to work. It needs a readable shape and enough patience to build the pattern one connection at a time. After that, you can decide whether to stay with handmade templates or try a photo-based pattern from StringArt.cc.